PVC (Polyvinyl Chloride) pipes offer numerous advantages, including durability, corrosion resistance, and cost-effectiveness. Proper installation methods ensure these pipes perform optimally in various applications, from water supply systems to waste and drainage systems. Here, we explore the essential techniques and best practices for installing PVC pipes effectively.
Preparation and Planning
Assessing the Site
Begin with a thorough assessment of the installation site. Identify the layout, dimensions, and any potential obstacles that might affect the installation process. This assessment helps in determining the correct pipe sizes, lengths, and types required for the project.
Gathering Tools and Materials
Collect all necessary tools and materials before starting the installation. Essential tools include a measuring tape, pipe cutter or saw, deburring tool, marker, and personal protective equipment (PPE) such as gloves and safety goggles. Materials needed include PVC pipes, fittings, primer, and solvent cement.
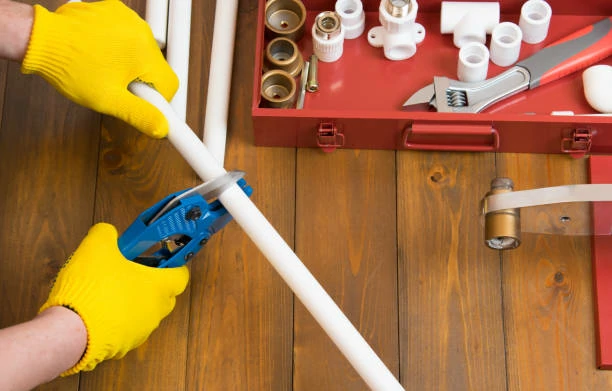
Measuring and Cutting
Accurate measurement and cutting ensure a proper fit and alignment of PVC pipes. Measure the required length of each pipe segment using a measuring tape and mark the cutting points with a marker. Use a pipe cutter or saw to make clean, straight cuts. After cutting, remove any burrs or rough edges with a deburring tool to ensure smooth connections.
Joining Methods
Solvent Welding
Solvent welding creates strong, leak-proof joints between PVC pipes and fittings. Follow these steps for effective solvent welding:
Cleaning the Surfaces: Clean the ends of the pipes and the inside of the fittings with a clean cloth to remove dirt, grease, and moisture.
Applying Primer: Apply a uniform coat of PVC primer to the outside of the pipe end and the inside of the fitting socket. The primer softens the surfaces, preparing them for solvent cement.
Applying Solvent Cement: Apply a generous coat of PVC solvent cement to the primed areas. Ensure even coverage on both the pipe and the fitting.
Joining the Pipe and Fitting: Immediately insert the pipe into the fitting, giving it a quarter turn to evenly distribute the cement. Hold the joint in place for a few seconds to allow the cement to set.
Curing Time: Allow the joint to cure according to the manufacturer’s instructions before handling or pressurizing the system.
Rubber Gasket Joints
Rubber gasket joints, also known as push-fit or slip-on joints, provide a quick and reliable connection method without the need for solvents or adhesives. Follow these steps for rubber gasket joints:
Lubricating the Gasket: Apply a suitable lubricant to the rubber gasket inside the fitting. This lubricant facilitates easy insertion and ensures a tight seal.
Inserting the Pipe: Align the pipe end with the fitting and push it in firmly until it contacts the gasket. Ensure the pipe seats fully in the fitting.
Checking for Proper Fit: Verify the joint’s integrity by checking for uniform contact between the pipe and the gasket. Adjust as necessary to ensure a secure and leak-proof connection.
Support and Alignment
Providing Adequate Support
Proper support prevents sagging, misalignment, and stress on the PVC pipes. Install hangers, brackets, or supports at regular intervals along the length of the pipes. Follow these guidelines for optimal support:
Horizontal Runs: Space supports every 3-4 feet for horizontal pipe runs. Ensure supports are closer near joints and changes in direction.
Vertical Runs: For vertical pipe runs, space supports every 5-6 feet. Secure the pipes firmly to prevent movement and ensure stability.
Ensuring Proper Alignment
Correct alignment minimizes stress on joints and prevents leaks. Align the pipes accurately during installation, checking for level and plumb orientations. Use a level tool to verify alignment and make adjustments as needed.
Testing and Inspection
Pressure Testing
Conduct pressure testing to verify the integrity and leak-proof nature of the installed PVC pipe system. Follow these steps for pressure testing:
Sealing the System: Close all outlets and seal the ends of the pipes to create a closed system.
Filling with Water: Fill the system with water, ensuring all air pockets are eliminated. Use a pressure pump to pressurize the system to the required test pressure.
Monitoring Pressure: Monitor the system for a specified duration, checking for any pressure drops or visible leaks. Repair any detected issues before proceeding.
Visual Inspection
Perform a thorough visual inspection of the entire PVC pipe installation. Look for signs of misalignment, incomplete joints, or damage to the pipes. Ensure all supports and brackets are securely in place.
Special Considerations
Thermal Expansion and Contraction
PVC pipes expand and contract with temperature changes. Incorporate expansion joints or loops to accommodate this movement, especially in long pipe runs. This precaution prevents stress and potential damage to the pipes.
Buried Pipe Installations
For buried pipe installations, follow these guidelines:
Trench Preparation: Excavate trenches with sufficient width and depth to accommodate the pipes and provide adequate cover. Remove sharp objects and debris from the trench bottom.
Bedding Material: Use suitable bedding material, such as sand or fine gravel, to provide a stable base for the pipes. Place and compact the bedding material evenly.
Backfilling: Backfill the trench in layers, compacting each layer to ensure stability and prevent pipe movement. Avoid using heavy machinery directly over the pipes to prevent damage.
Maintenance and Repair
Regular Maintenance
Regular maintenance ensures the longevity and performance of PVC pipe systems. Conduct periodic inspections to check for signs of wear, leaks, or damage. Clean the pipes and remove any debris or obstructions that may affect water flow.
Repairing Damaged Pipes
In case of damage, follow these steps to repair PVC pipes:
Identifying the Damage: Locate the damaged section of the pipe and mark the area.
Cutting Out the Damaged Section: Use a pipe cutter or saw to remove the damaged section of the pipe. Ensure clean, straight cuts.
Installing a Replacement Section: Measure and cut a replacement pipe section to fit the gap. Use appropriate joining methods, such as solvent welding or rubber gasket joints, to connect the replacement section.
Testing the Repair: Conduct a pressure test to verify the integrity of the repair. Check for any leaks or issues and address them as needed.
Conclusion
PVC pipes offer a reliable and cost-effective solution for various plumbing and water distribution applications. Proper installation methods, including solvent welding, rubber gasket joints, and adequate support, ensure optimal performance and longevity. Regular maintenance and timely repairs further enhance the reliability of PVC pipe systems. By following these best practices, contractors and builders can achieve efficient and durable plumbing installations that meet the demands of modern construction projects.
Contact
IFAN is a professional manufacturer with 30 years of experience, dedicated to producing high-quality plastic pipes, fittings, and valves. Our products include brass valves, PPR valves, as well as various pipes and fittings to meet different customer needs. Whether you need plumbing and drainage pipes or valve products, IFAN can provide a diverse range of high-quality, cost-effective products to support your projects. Below is our contact information.
We will reply your email or fax within 24 hours.
You can call us at any time if there is any question on our production.
For more information,pls visit our webside https://www.ifanplus.com/
Pls Mailto: [email protected]